Installing a woodstove yourself
is a serious task. Consider hiring a professional to do your
installation, because without proper caution, lives are at
risk from fire. No two woodstove pipe setup is the same so
there is no guide to provide you. The instruction collected
on this page is for information purposes only. It is not distributed
by any manufacturer and is not intended to be used to install
woodstove infrastructure. Refer to your product-specific manufacturer
instructions and specifications as well as all applicable
local, state and national regulations. The construction and
installation of chimneys and woodstoves is strictly regulated
by building codes and fire safety ordinances. |
|
Quick note: Many people say "double wall pipe" when they actually mean Class A insulated chimney pipe.
These are not the same thing. Understanding the difference is critical for both safety and code compliance. |
| What is single-wall stove pipe? |
Single-wall stove pipe (also called single-wall connector pipe) is the most common type of pipe used
inside the home to connect your wood stove to the chimney.
- Most common / "everyone uses it": It's widely used because it's cost-effective and easy to install.
- Where it's used: Only as the connector from stove to chimney, typically within the same room.
- Radiates heat: Single-wall pipe gives off more heat into the room.
- Requires larger clearances: It typically needs more space away from combustible walls and ceilings.
- Cannot pass through walls/ceilings: Single-wall stove pipe is NOT rated to pass through combustible walls,
ceilings, attics, or exterior installations.
Best for: Installations with plenty of room where clearance is not a challenge and you want maximum radiant heat output. |
| What is double-wall stove pipe (double-wall connector pipe)? |
Double-wall stove pipe (also called double-wall connector pipe) is a connector pipe option for the interior run
from stove to chimney, just like single-wall - but built with two walls and an airspace or insulation layer between them.
- Less common than single-wall: Many homes don't need it, but it's very useful when space is tight.
- Used to reduce clearances: The main reason customers buy double-wall connector pipe is to reduce clearance to combustibles
when the stove must sit closer to a wall or ceiling.
- Often drafts better: It helps keep flue gases hotter (especially on startups), which can improve draft and reduce smoke issues.
- May reduce creosote buildup: Hotter flue temps can reduce condensation and creosote formation (burn habits still matter most).
- Some say it lasts longer: Because the interior wall may resist corrosion better and stays hotter/drier, many homeowners
report longer service life than thin single-wall pipe - but lifespan depends heavily on usage and maintenance.
- Still NOT chimney pipe: Double-wall connector pipe still cannot be used as a chimney through ceilings or outside the home.
Best for: Installations where clearance reduction is necessary or draft performance needs improvement. |
| What is Class A chimney pipe (insulated chimney pipe)? |
Class A chimney pipe is an insulated chimney system designed for high temperatures and is rated for use
where connector pipe cannot be used.
This is the pipe required for:
- Passing through a wall (with an approved wall thimble / pass-through kit)
- Passing through a ceiling and attic (with a ceiling support box)
- Exterior chimney runs along the outside of the home
- Continuing from the stove connection area all the way to the chimney cap above the roofline
Why people call it "double wall": Most Class A chimney systems look like a heavy-duty double-wall pipe, and they often
are double-wall (or even triple-wall) construction - but the important point is that it is insulated and listed as a chimney system,
not connector pipe.
In plain English:
- Connector pipe (single/double wall): goes from the stove to the chimney (inside the room).
- Class A chimney pipe: is the insulated chimney system that can safely pass through walls/ceilings and run outdoors.
Best for: Any part of the system that is functioning as the chimney itself - especially through building structure and outside. |
| Can I use double-wall stove pipe as chimney pipe through my ceiling or outside? |
No. Double-wall stove pipe (connector pipe) is not rated for passing through walls or ceilings and is not rated
for exterior chimney runs.
If you need to pass through a ceiling, wall, attic, or run up the outside of your home, you must use a Class A insulated chimney system rated for that use. |
| Quick comparison: single wall vs double wall vs Class A chimney pipe |
- Single-wall stove pipe: common, affordable, good radiant heat, needs more clearance.
- Double-wall stove pipe: less common, used to reduce clearances and improve draft, may last longer.
- Class A chimney pipe: insulated chimney system required for walls/ceilings/exterior runs.
|
|
If you're trying to decide between single-wall, double-wall, and Class A chimney pipe, it helps to think in terms of where the pipe is located and what it's passing through. |
| Step 1: Identify the "connector" section (inside the room) |
The pipe you see running up from the stove inside your living space is usually connector pipe.
That connector can be single-wall or double-wall depending on clearance needs and performance goals. |
| Step 2: Identify the "chimney" section (through structure or outdoors) |
As soon as the venting system needs to pass through a ceiling, wall, attic, or run outside, you're in "chimney system" territory - and that means Class A insulated chimney pipe (plus the proper support boxes, thimbles, flashing, and termination parts). |
| Quick rule of thumb |
- Inside the room (stove to support box / thimble): single-wall or double-wall connector pipe
- Through the house and/or outdoors: Class A insulated chimney pipe
Important: Always follow your stove manual and local code requirements. If your installation is tight on space,
the clearance specs for your connector pipe choice matter as much as the stove's clearance specs. |
|
| Who
do I need to notify before installing a woodstove? |
- Check with your local building official for local regulations
and whether a permit will be required. As a general rule,
installation instructions from the stove manufacturer for
clearances and connections (new stoves are approved by Underwriters
Laboratory (UL) national standards) take precedence over
other building codes. National Fire Protection Association
Code 211 (below) should be followed if no UL guidelines
exist.
- Inspection and approval of woodstove installations in
some areas is done by the Fire Marshall.
- Finally notify the agent who handles your homeowner's
insurance to make sure you comply with your policy terms.
|
| National Regulation
Authority |
Local building codes derive their regulations from
"National Fire Protection Association (NFPA) 211: Standard
for Chimney, fireplaces, vents, and solid fuel-burning appliances."
Free personal access to updated standards online at www.nfpa.org.
As you prepare for a do-it-yourself woodstove installation,
it will be a very handy reference.
|
|
| How to
decide to use a chimney as is, repair it or give up and install
a new one |
| A chimney properly designed is prerequisite for
safe woodstove installation. This decision is based on the evaluation
of suitable heat-resistant material for construction (clay,
brick, concrete), expertly leak and
other-outside-element proof, the correct diameter and height, and be separated the appropriate distance
from combustible materials. |
| Is my chimney
the right size for a woodstove? |
Area of Pipe - Regulations prohibit
attaching a woodstove to a chimney that has a cross-sectional
area smaller than, or more than three times larger than, the
stove's outlet.
Height of Chimney - Taller chimneys draw better than
shorter ones. 12' from the stovepipe connector to the top -
is a practical minimum. The Chimney must be at least 3' above
the roof and 2' higher than any part of the building within
10'.
Maximum
Chimney Sizes According to Stove Outlet Diameter |
| Outlet |
Round Chimney (inside) |
5"
6"
8" |
8"
10 "
14 " |
|
| Masonry
and Factory Built Chimneys |
| The Chimney must be in good condition with a flue
lining. It is a good yearly habit for missing flue tiles and
cracked masonry. With a masonry chimney, the stovepipe should
be extended through the chimney wall to the inside wall, but
no more. You can use high-temperature
furnace cement to fasten the pipe to the masonry. If you
cannot close off your fireplace or the chimney is otherwise
unsuitable / nonexistent, a factory-built chimney listed and
tested by UL is a favorable option. |
| I have
holes in my chimney from a previous stove installation. What
can I do? |
A chimney must be appropriately sealed from
outside air and water for the proper flue draft and normal
functioning of a woodstove. If you have old holes in your
chimney, you need to plus them.
|
| Chimney
Maintenance |
| this section is in the building process. It will
be coming soon. |
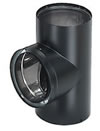
| How
to Equipt chimney with cleanout (as required by many codes?) |
It is often easiest to include
access to cleaning the chimney in the stovepipe using a Cleanout
T. The stem of the T faces the stove with one side connecting
up to the chimney and the other facing down, covered by a
cap and used for cleaning the stovepipe installation.
 |
| How
to prevent creosote buildup? |
| Make sure you install your woodstove in a manner
that will permit access to both the connector pipe and the chimney
flue for the periodic cleaning necessary to remove soot and
cresote buildup on the interior surfaces. Creosote can be safely
removed from glass with a nonabrasive household window cleaner. |
|
| A new woodstove will include a list of minimum
clearances to combustible materials. Providing this information
is a requirement for UL Approval. |
| What
are woodstove clearance requirements for floors? walls? ceilings? |
Standard Clearances for fireplace stoves according
to NFPA 211 is 36" for front, back, sides, and top of
of stove. There are two concerns when protecting a floor which
includes heat from the stove and embers falling out onto the
floor. The protection should extend under the stove and outward
for a distance of 18" on all sides.
Floor
Protection Degree based on the height of the stove body
above the floor. |
| Height Above Floor |
Requires |
nolegs |
Floor noncombustable
|
| 2-6" |
hollow concrete blocks 4" thickon top of 24 gauage
or thicker sheat metal. |
6" |
bricks, rocks or blocks at least 2"
thick on top of 24 gauage or thicker sheat metal. |
|
| How
can clearences be reduced? |
| The clearnence for the stove itself is 36"
from any combustible. Knowing this you're going to want to discover
ways to reduce the allowable clearance. For the stove itself,
unless specifically designed for lesser clearance, NFPA standards
state the clearance after an effective thermal barrier reduction
shall not be less than 12" to combustible walls and 18"
to combustible ceilings. 12" offers much more flexibility
on stove sitting location.
Stovepipe connector clearence is unually about 18" (for
single wall stove pipe, that is) and can be reduced (with
radiant barriers). Clearance-reduction methods are all variations
on one theme: providing a non-combustible barrier (like sheet
metal) to radiant heat with a free-flowing air space behind
it. Double wall stove pipe can also reduce stove pipe clearance
between 6" - 8". See the
difference between single and double wall stove pipe by clicking
here.
Click to shop stovepipe, find
the pieces you need. |
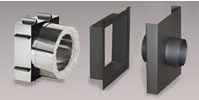
| Can I pass
my stove pipe through a wall or cealing? |
If it is possible, you want to avoid having
stove pipe go through a wall or ceiling. It is much better
to install the woodstove near the chimney or relocate the
chimney altogether. There may be situations when a stovepipe
must pass through a combustible wall to reach a chimney. (Neither
NFPA regulations or building codes allow stovepipe to pass-through
a floor or ceiling; you must use a factory-built or masonry
chimney that continues unbroken to the top). The traditional
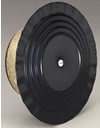
wall-pass though is the Ventilated Insulated Thimble.
|
|
Make stove pipe connections as short and straight
as possible using the minimum number of elbows. This is how
maximum efficiency is achieved. |
| Why a good
stovepipe connection is so important. |
| A good connection increases woodstove draft efficiency.
This increased draft makes your woodstove more efficient. It
slows the buildup of creosote while slimming the chances water
or soot will buildup within the vent. A good draft makes less
"smoking" of the stove happen at startup. |
| Can
I install a longer stovepipe connection to the chimney for more
heat? |
| Longer pipe sections do extract additional heat
from the flue, but it results in reduced flue draft and increased
creosote buildup. Ensuring good draft, in the shortest connection
of stovepipe to the flue, is key achieving lower emissions and
the best efficiency of your woodstove. Moreover, higher efficiency
lowers flue gas temperatures thus very little is to be gained
by unnecessary longer pipe connections. |
| What size stovepipe
and gauge metal should I buy? |
| Pipe size should match the outlet size of the
stove. The lower the gauge number the thicker the metal is.
The thicker the metal the longer your stove pipe will last before
replacement. You want to aim for a 24-gauge or thicker pipe
for stovepipe connections 6" in diameter or bigger. |
| Stove Pipe Life
expectancy? Are there types of metals to avoid? |
| Stovepipe connectors are expected to wear out
typically after 3 - 5 years. Stovepipe connections should be
inspected regularly and replaced when needed. |
| Are there types
of metals to avoid? |
| We recommend avoiding galvanized connectors -
this type of pipe is used for air duct ventilation - because
zinc is added to reduce corrosion rate. |
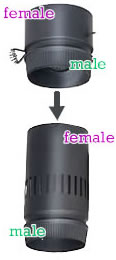
| Which way is
up? |
Install stovepipe so male end is pointing down
and the female end is up. This will prevent liquid creosote
from dripping down the sides of your pipe.
 |
| What should
the slope be for my Horizontal Runs of stovepipe? |
| Slope should be 1/4" per 1' toward the stove.
This encourages creosote to drain back toward the firebox and
facilities necessary draft. A horizontal run should never be
more than 3/4 the height of the chimney (in case you have a
very long horizontal run under consideration). The pipe should
be supported every 6'. |
| Is it
a good connection? |
Joints should fit tightly so room air cannot enter
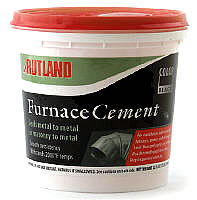
the stovepipe draft chimney system. Furnace cement works well
to insure tightness. Rivets or screws can be used at pie joints
for added strength - use about 3 at each connection.
|
Item |
Ounces |
Item
# |
Price |
Weight |
Buy |
Rutland Black
Furnace Cement |
16 |
C1785831 |
$5.49 |
4 lbs |
|
|
| Can I connect
my woodstove to my chimney beginning on the second floor? Even
if there is already a heater on the first floor connected? |
Stovepipe can enter a chimney on a floor that
is not the bottom-most. This used to be done by sealing the
chimney at the base of its flue tile (above the fireplace's
smoke chamber) not at the fireplace opening or damper.
Unless your stove heater is listed for such a connection, solid
fuel burning appliances cannot be connected to a chimney flue
serving another appliance (like a furnace or water heater).
Venting two heaters with one chimney can increase the chance
of fire and can allow dangerous gasses into your home. |
| Direct
Chimney Connection? |
| Direct connection specifies that stoves and fireplace
inserts must be positively connected to the flue tile itself
and that the fireplace damper be removed and sealed with a sheet
of steal. There are many kits to accomplish this tricky business.
Of course, you can always reline your whole chimney from the
fireplace insert to the top of the chimney, as chimney experts
say it's the safest way to go. |
|
| Using a Manual
Damper |
| Some wood burning stoves have an automatic draft
regulator controlled by the thermostat. A manually operated
damper can be installed on the pipe near the stove and it should
not obstruct more than 80% of the pipe area. |
More Considerations |
Have a smoke dector positioned at recommended
locations.
Ready an ABC-rated fire extinguisher located nearby with
everyone in the household trained how to use it.
Install a Stovepipe
Thermometer to help operate the stove optimally and to
warm of a chimney fire.
Once you have an operating stove, check your stove weekly for
creosote until you learn how quickly the accumliation happens.
Once it reaches 1/4" clean it out or have a chimney sweep
do it for you. |
| Frequently Asked Questions About
Stove Pipe |
|
| A Few Words To The Wise |
1. Stick with one brand of stovepipe
for connecting woodstoves to chimney. This ensures the
most secure stovepipe connection. Learn
why a good stovepipe connection is so important.
2. For most stovepipes 3 screws are required to fit each
pipe connection tightly
3. New stovepipe and woodstove instalations may smoke
a little and emit an odor when first used. This is normal
curing of the paint on the pipe. Allow ventalation of
an open a window or door to allow the smoke and fumes
to escape durning the beginning of your first wood burning
stove fire.
Return to top of page |
|